Upgrading System Firmware on the NEC SL2100
Upgrading System Firmware on the NEC SL2100
This Tech Tip will demonstrate how to upload System Firmware to the NEC SL2100 phone system – but remember, our systems always come pre-loaded with the newest firmware, right out of the box!
Important!
We strongly recommend backing up the current programming before performing a firmware update!
Get Connected
This Tech Tip requires access to the phone system using NEC PCPro Programming Software. To download the latest version of PCPro or for instructions on how to connect your computer to the phone system, please read the following: How to Connect to the NEC SL2100 or SL1100 Phone System for Programming.
PCPro Programming Steps
1. Go to the “Home” Tab in PCPro
2. Click on the “Upgrade SW”

3. In the pop-up window, select “Firmware Update From PCPro”
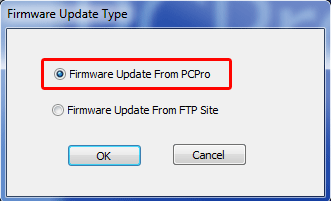
4. Click the “OK” button
5. In the Firmware Update pop-up window, use the “File” field to browse your computer and select the firmware package that you will upload
6. Schedule the update
• Immediately after upload: This setting will automatically start the update as soon as the upload is completed
• At the time of: This setting allows you to select a date and time that the update will take place
7. Click the “Run” button
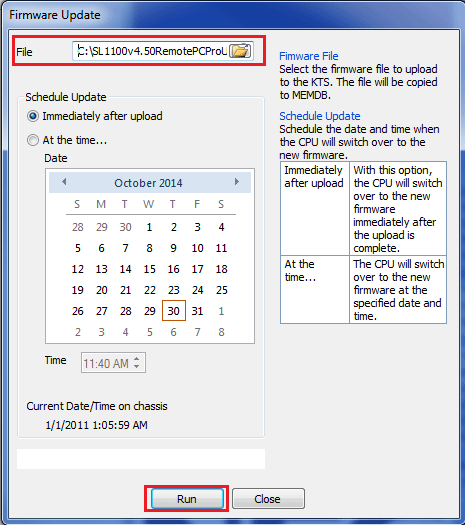
Note: If you select “Immediately after upload” the KSU will reboot after the upload is complete and you will get an error message from PCPro saying the connection has been lost. This is normal.
8. When the system returns to operating status, press menu at any extension, dial 93, then press select to verify software version
WebPro Programming Steps
1. Once logged in to WebPro, click on the Maintenance button (wrench)

2. On the left sidebar, click the “Software Update” link
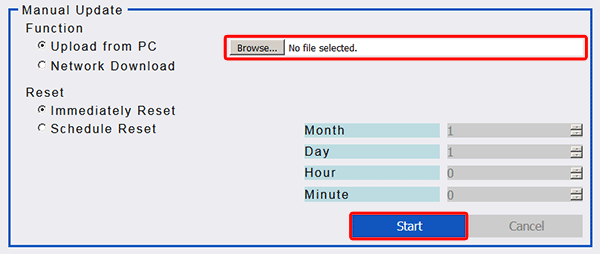
3. In the Manual Update section, click the “Browse” button
4. Browse your computer and select the firmware package that you will upload
5. Schedule the update
• Immediately Reset: This setting will automatically start the update as soon as the upload is completed, and reset the system immediately
• Schedule Reset: This setting allows you to select a date and time that the update will take place
5. Click the “Start” button
6. When done, the progress bar will display “Completed”
If you chose the “Immediately Rest” option, then don’t click on anything further. The system will automatically reset on its own.
7. When the system returns to operating status, press menu at any extension, dial 93, then press select to verify software version