Programming a Manual Night Mode Button on the NEC SL2100 or SL1100
Programming a Manual Night Mode Button on the NEC SL2100 or SL1100
This Tech Tip demonstrates how to program all phones to ring, then overflow and be answered by the Part Time InMail Auto-Attendant during the day and play a separate greeting at night by utilizing a Manual Night Function Key via a Virtual Extension. This tip applies to the NEC SL2100 and NEC SL1100 Phone Systems.
Get Connected
This Tech Tip requires access to the phone system using NEC PCPro Programming Software. To download the latest version of PCPro or for instructions on how to connect your computer to the phone system, please read the following: How to Connect to the NEC SL2100 or SL1100 Phone System for Programming.
Programming Steps
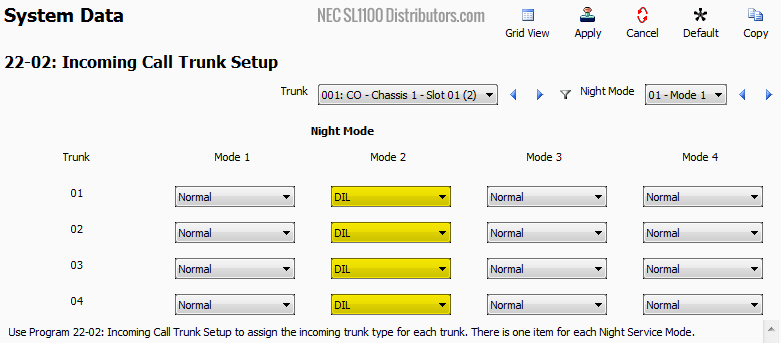
1. Go to Program 22-02: Incoming Call Trunk Setup
Mode 2 will become our “Night Mode” and Mode 1 will stay our “Day Mode”
2. Set Mode 2 to “DIL” for all Trunks
3. Go to Program 22-07: DIL Assignment
4. Set Mode 2 to “250” for all Trunks

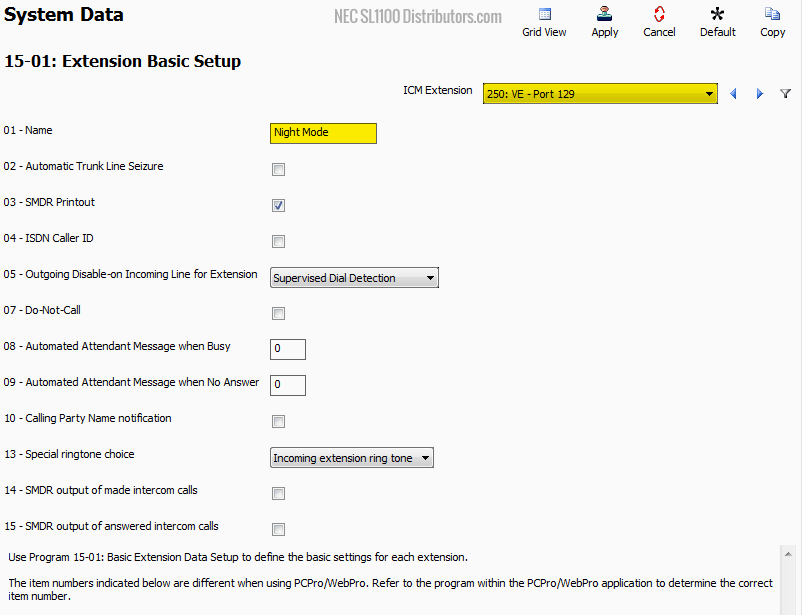
5. Go to Program 15-01: Extension Basic Setup
6. In the ICM Extension Dropdown Menu, select Extension 250
7. Set the value of 15-01-01: Name to “Night Mode”
8. Go to Program 24-09: Call Forwarding Fixed Settings
9. In the ICM Extension Dropdown Menu, select Extension 250
10. Set the value of 24-09-01: Call Forward Type to “Call Forward All Calls”
11. Set the values of 24-09-02 through 24-09-05 to “3999”
This sets the Call Forward destination to the Voicemail Pilot Number, which is 3999.

12. Go to Program 47-02 InMail Station Mailbox Options
In this program we will undefine and remove Virtual Extension 250 from having a Personal Mailbox in InMail
13. Navigate to Mailbox 113 using the Mailbox (1~128) search field
14. Set the value of Program 47-02-01: Mailbox Type to “Undefined”
15. Remove the value of Program 47-02-01: Mailbox Extensions and leave the field empty.

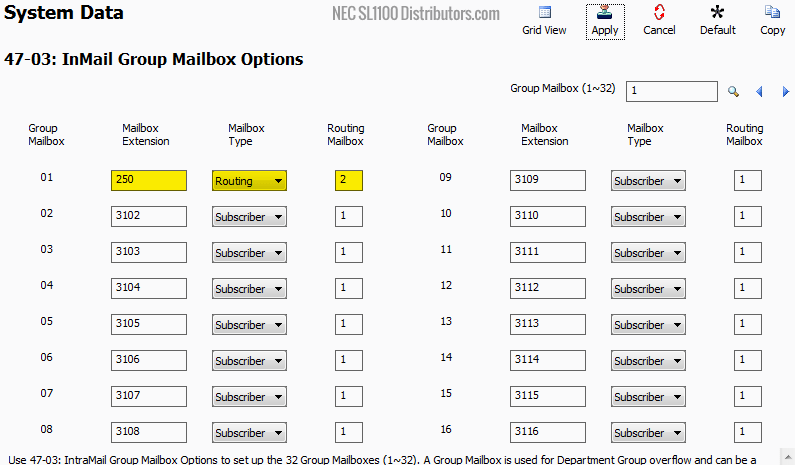
16. Go to Program 47-03 InMail Group Mailbox Options
Here we will assign Group Mailbox 01 to Virtual Mailbox Extension 250 (Our “Night Mode” Virtual Extension) and we will configure it as a “Routing” Mailbox Type. Lastly we will configure it to play Routing Mailbox 2 (002).
17. For Group Mailbox 01, set the following values:
Mailbox Extension: 250
Mailbox Type: Routing
Routing Mailbox: 2
18. Go to Program 47-08: Routing Mailbox Call Routing Options
In this program you have the option to assign different Dial Action Tables (Configured in program 47-13) to a specific Routing Mailbox.
19. For all Routing Mailboxes, set the Dial Action Table value to “1”

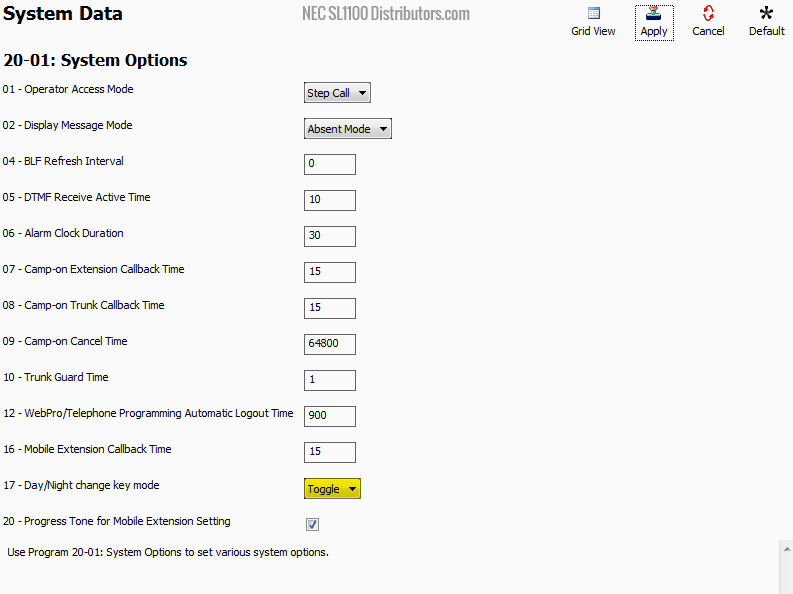
20. Go to Program 22-01: System Options
21. Set the value of 20-01-17: Day/Night Change Key Mode to “Toggle”
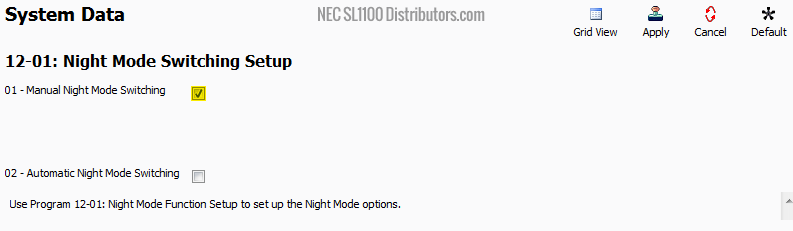
22. Go to Program 12-01: Night Mode Switching Setup
23. Make sure the checkbox next to 12-01-01: Manual Night Mode Switching is checked
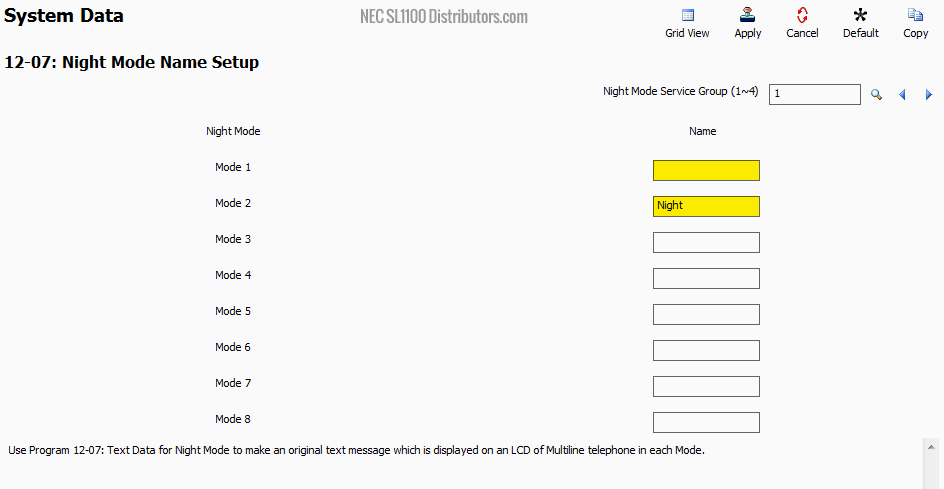
24. Go to Program 12-07: Night Mode Name Setup
On this page we program what the phones will display on the Phone’s LCD when they are toggled through different modes.
We will be using Mode 1 as our Day mode (with Mode 1 name blanked out, the display will just show the extension number and extension name) and Mode 2 as our Night Mode (the display will show Night on the phones when the phone is manually toggled into Mode 2)
25. For Mode 1, remove any value from the Name field, and leave it empty
26. For Mode 2, set the value of the Name field to “Night”
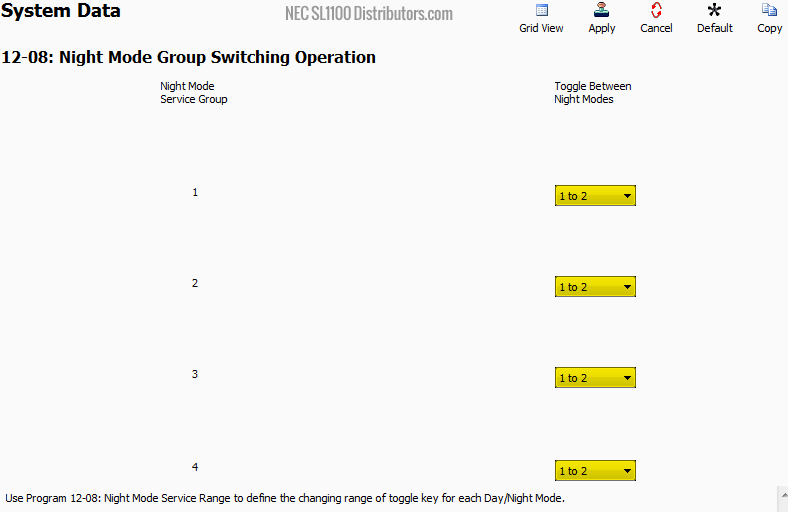
27. Go to Program 12-08: Night Mode Group Switching Operation
Here we adjust what Modes the User is able to toggle between for each Night Mode Service Group using the Function Key set in 15-07. We will make Night Mode Service Group 1 Toggle between Night Modes 1 to 2. Mode 1 Day and Mode 2 Night (Manual Function Key).
28. Set the value of every Dropdown Menu to “1 to 2”
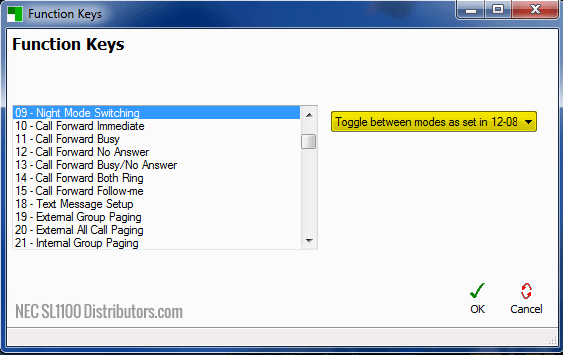
29. Go to Program 15-07: Function Keys
30. Navigate to Function Key 12 using the Function Key (1~48) search field
31. For Function Key 12, use the dropdown menu to set its value to “09 – Night Mode Switching”
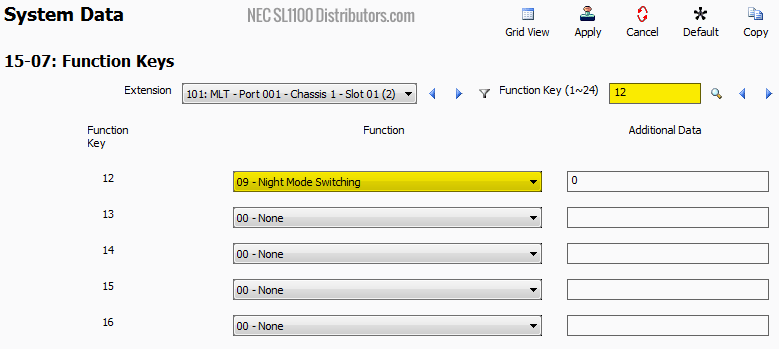
32. A sub window will open, set the dropdown menu to “Toggle between modes as set in 12-08”
33. Apply and upload your changes