Full Time Voicemail Attendant on the NEC SL2100 and SL1100
Full Time Voicemail Attendant on the NEC SL2100 and SL1100
This Tech Tip will demonstrate how to program a Full Time Auto-Attendant, meaning all incoming calls will be answered by the InMail Voicemail system immediately. This tip applies to both the NEC SL2100 and NEC SL1100 Phone System.
Get Connected
This Tech Tip requires access to the phone system using NEC PCPro Programming Software. To download the latest version of PCPro or for instructions on how to connect your computer to the phone system, please read the following: How to Connect to the NEC SL2100 or SL1100 Phone System for Programming.
Example Overview
In this example, the phone system Auto-Attendant will immediately pick up all phone calls at all times of the day.
We will set up two different greetings:
– Day Greeting (Mode 1)
– Night and Weekend Greeting (Mode 2)
PCPro Programming Steps
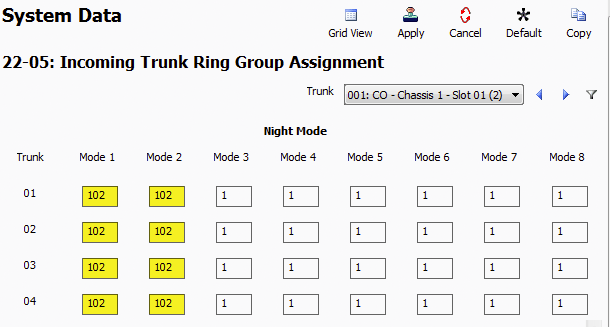
1. Go to Program 22-05: Incoming Trunk Ring Group Assignment
2. For all trunks, set the values of Mode 1 and Mode 2 to “102”
Note: 102 is the InMail Voicemail Pilot Number for Incoming Ring Groups. This is not to be confused with Extension 102.
3. Go to Program 47-12: InMail Answer Schedules
4. For Schedule 01, set the following values:
Schedule Type: Range of Days
Answering Mailbox Type: Routing
Answering Mailbox Number: 1
Scheduled Day of Week: Sunday
Scheduled Range of Days Start: Monday
Scheduled Range of Days End: Friday
Scheduled Date: 00/00
Scheduled Starting Time: 07:00
Scheduled Ending Time: 20:00
Based on the settings above, this business will be open Monday through Friday, from 7:00 AM to 8:00 PM.

5. Go to Program 47-11: InMail Answer Table Options
6. For Answer Table 01, set the Default Mailbox Type to “Routing Mailbox” and set the value of Default Mailbox Number to “2”
This value defines the Routing Mailbox Number that answers the calls during any times Outside of the business hours we defined in step 4.

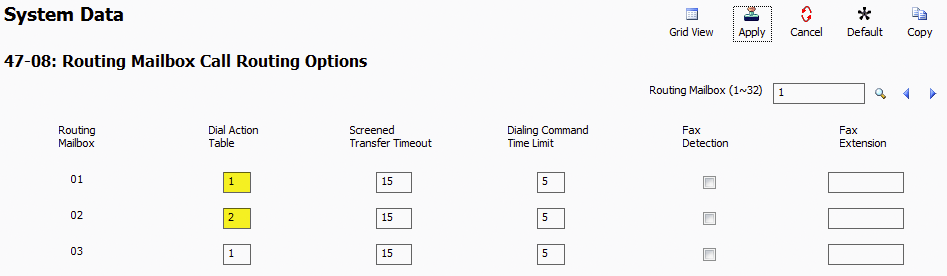
7. Go to Program 47-08: Routing Mailbox Call Routing Options
8. For Routing Mailbox 01, set the Dial Action Table to “1”
9. For Routing Mailbox 02, set the Dial Action Table to “2”
This program is how to associate a Routing Mailbox with a Dial Action Table. By default all Routing Mailboxes are set to Dial Action Table 1.
Our example will have Routing Mailbox 01 (Day, Mode 1) follow Dial Action Table 1 and Routing Mailbox 02 (Night, Mode 2) follow Dial Action Table 2.
10. Go to Program 47-13: InMail Dial Action Tables
11. Use the Dial Action Table (1~32) Search field to navigate to Dial Action Table 1.
12. Enter the Dial Digits Destinations that apply to your business during the Day
Our example will have the following Routing Mailbox 001 (Day, Mode 1) Greeting:
“Thank you for calling ABC Widget Company. If you know your party’s extension you may dial it now.
For Mary, dial 101.
For Jim, dial 102
For Bob dial 103.
Or dial 0 or remain on the line to be transferred to the operator.”
The programming for our example daytime Dial Digits looks like this:

Note that the three capital X’s (XXX) resemble wild cards for any 100 series extension number. For example “If you know your parties extension please enter it at any time.”
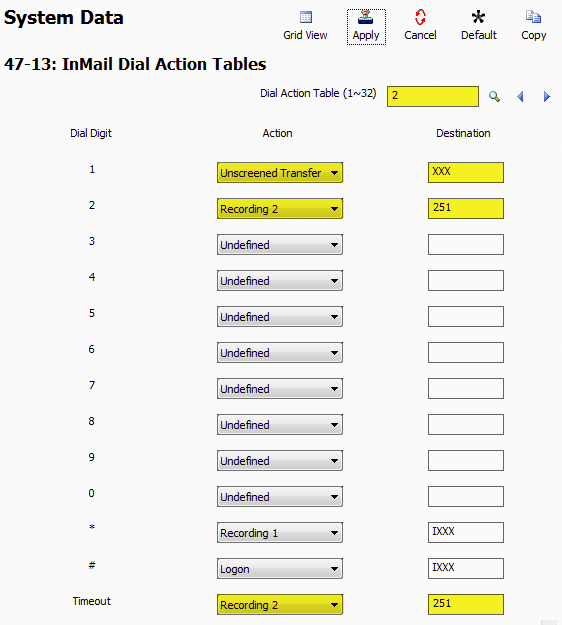
13. Use the Dial Action Table (1~32) Search field to navigate to Dial Action Table 2.
14. Enter the Dial Digits Destinations that apply to your business during the Night
Our example will have the following Routing Mailbox 002 (Night, Mode 2) Greeting:
“Thank you for calling ABC Widget Company. We are currently closed. To leave a message in our General Delivery Mailbox please dial 2 or remain on the line.”
This application will utilize a Virtual Extension for a General Mailbox and only Extension 101 will have access to this General Mailbox.
The programming for our example night time Dial Digits looks like this:
15. Go to Program 12-01: Night Mode Switching Setup
16. Click the checkbox next to 12-01-02: Automatic Night Mode Switching

17. Go to Program 12-02: Automatic Night Service Patterns
This program is where the Mode Switching takes place. During these defined times all digital phones will be displayed with the Mode Names that are programmed in 12-07 (see next step).
18. For Item 01:
• Set the Start Time to 00:00
• Set the End Time to the time that your business opens
• Set the Night Mode to 2
19. For Item 02:
• Set the Start Time to the time that your business opens
• Set the End Time to the time that your business closes
• Set the Night Mode to 1
20. For Item 03:
• Set the Start Time to the time that your business closes
• Set the End Time 00:00
• Set the Night Mode to 2

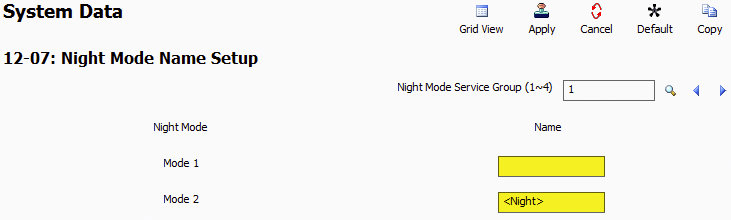
21. Go to Program 12-07: Night Mode Name Setup
This program is where you can specify what shows up on all digital phone’s when the system is in different modes.
22. Set the Name for Mode 1 as blank (empty)
23. Set the Name for Mode 2 as <Night>
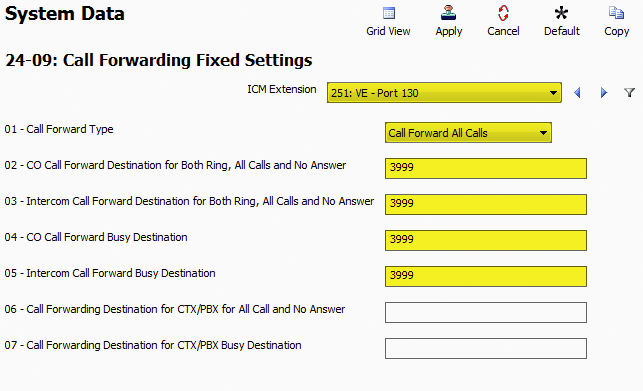
24. Go to Program 24-09: Call Forwarding Fixed Settings
This program is where we will forward all calls to the Voicemail Pilot Number (3999)
25. Use the ICM Extension Dropdown Menu to select “251”
26. Set the value of 24-09-01: Call Forward Type to “Call Forward All Calls”
27. Set the values of 24-09-02 through 24-09-05 to “3999”
28. Go to Program 15-07: Function Keys
This program is where we will assign a Voicemail Button for our Night Time General Delivery Mailbox, Virtual Extension 251.
29. For Function Key 07, set the Function to “In-skin Voice Mail”
30. For Function Key 07, set Additional Data to “251”

Recording the Greetings
To complete your Full Time Auto-Attendant, record the following greetings:
- Daytime Auto Attendant Message (001)
- Nights/Weekends Auto Attendant Message (002)
- Any individual extension mailbox greetings (ext. 101, 102, 103 & 104)
Learn how to Record an Auto Attendant Greeting Using a Phone