Installing a DT920 IP color phone on the NEC SL2100
Installing a DT920 IP Color Phone on the NEC SL2100
The DT920 requires additional programming setup steps from the black & white IP phone model. This Tech Tip demonstrates the steps required to make the phone register on the SL2100 system.
Requirements
- NEC SL2100 System Firmware 2.20
- NEC SL2100 PCPro Software 2.20
- Gigabit Ethernet / 32-Button License
Registering the DT920 Phone Through Telephone Programming
Plug the DT920 IP phone into the same network as the SL2100 phone system. Once it attempts to register, perform the following steps:
1. Dial HOLD + TRANSFER + * + #
2. Arrow down to the password field and type 6633222 (NEC)
- Press 2 – SIP Settings
- Press 2 – SIP Server Address
- Press 1 – 1st Server Address
- Type in the IP address found in PCPro Program: 10-12-09
- Press OK, exit
- Press 1 – 1st Server Address
- Press 4 – SIP server port
- Press 1 – 1st server port, type in 5080
- Press OK, exit
- Press 1 – 1st server port, type in 5080
- Press 1 – Network settings
- Press 6 – Advanced setting
- Press 5 – LLDP mode
- Arrow up to disable
- Press OK, keep pressing exit until the save option appears
- Press 6 – Advanced setting
- Press save
- Press 2 – SIP Server Address
The phone will reboot and register.
Once the phone registers, you can use web programming for the remaining options.
Finding Your IP Address Through the DT920 Telephone
Press and hold the “Home” button. Dial 2 + 2 + press the “Down” soft key.
Log into the DT920 Phone Using a Web Browser
1. Open a web browser and type the phone’s IP address into the browser’s address bar.
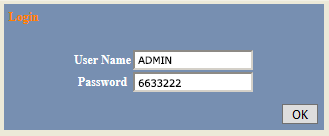
2. At the login screen use the following login credentials:
- Username: ADMIN
- Password: 6633222
Assigning the Gigabit Ethernet/32-Button License Through a Web Browser
Use PCPro or WEBPro to upload the license file into the system before assigning them to a phone.
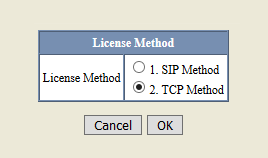
Select the License Method
1. Expand License Settings
2. Select License Method
3. Click the checkbox next to TCP Method
4. Click OK, then OK again
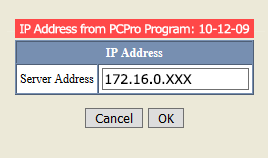
Set the IP Address
1. Expand TCP License Settings
2. Select License Server Settings
3. Select Server Address
4. Type in the IP address from PCPro Program: 10-12-09 (VOIP IP Address)
5. Click OK, then OK again
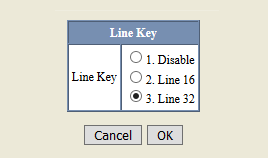
Assign the Line Keys (Buttons)
1. Click on License Request
2. Click on Line Key
3. Click the checkbox next to the desired line key option: 16 or 32
4. Click OK
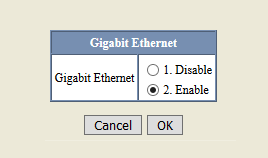
Enable Gigabit Ethernet
1. Click on Gigabit Ethernet
2. Click the checkbox next to Enable
3. Click OK
Click the Save button. The phone will reboot and grab a license from the phone system.
Assigning the Gigabit Ethernet/32-Button License Through Telephone Programming
The following steps are an alternative method to assigning the phone’s
license without logging in to the phone through a web browser.
1. Dial HOLD + TRANSFER + * + #
2. Use the Extension dropdown menu, to choose the extension you wish to add the function key to.
- Press 7 – License settings.
- Press 1 – License method
- Press 2 – TCP
- Press OK, exit
- Press 2 – TCP license settings
- Press 1 – License server settings
- Select server address
- Type in the IP address specified in PCPro Program: 10-12-09
- Press OK, exit
- Press 2 – License request
- Press 2 – Line key
- Press 2 – Line 32
- Press OK, keep pressing exit until the save option appears
- Press 1 – License server settings
- Press 1 – License method
- Press save
The phone will reboot.
With the license activated, 4 dots (circles) will appear in the LCD indicating the 4 pages of buttons. Use the “Multi” key to switch pages.
Use PCPro Program: 15-07 to assign the buttons, and Program: 15-20 to assign names to the buttons.

